How to Measure Your Stairs for a Stairlift
Why Measurements Matter More Than the Brand
The single biggest factor in your stairlift quote is the physical geometry of your staircase. A straight flight with 13 standard treads: $3,200-$4,500. The same house with a 90-degree turn at the top: $9,000-$12,000. The difference is entirely in the rail, and the rail is entirely determined by measurements.
Taking accurate pre-measurements tells you immediately whether you are looking at a straight or curved rail (which determines your price bracket), reveals complications before the home visit, and protects you from installers who eyeball the job and pad the quote.
Tools You Need (and One You Don't)
A laser distance measure (overkill, easy to get wrong on angles), a level (pitch is calculated from your measurements), or architectural plans. All measurements in inches. Measure twice.
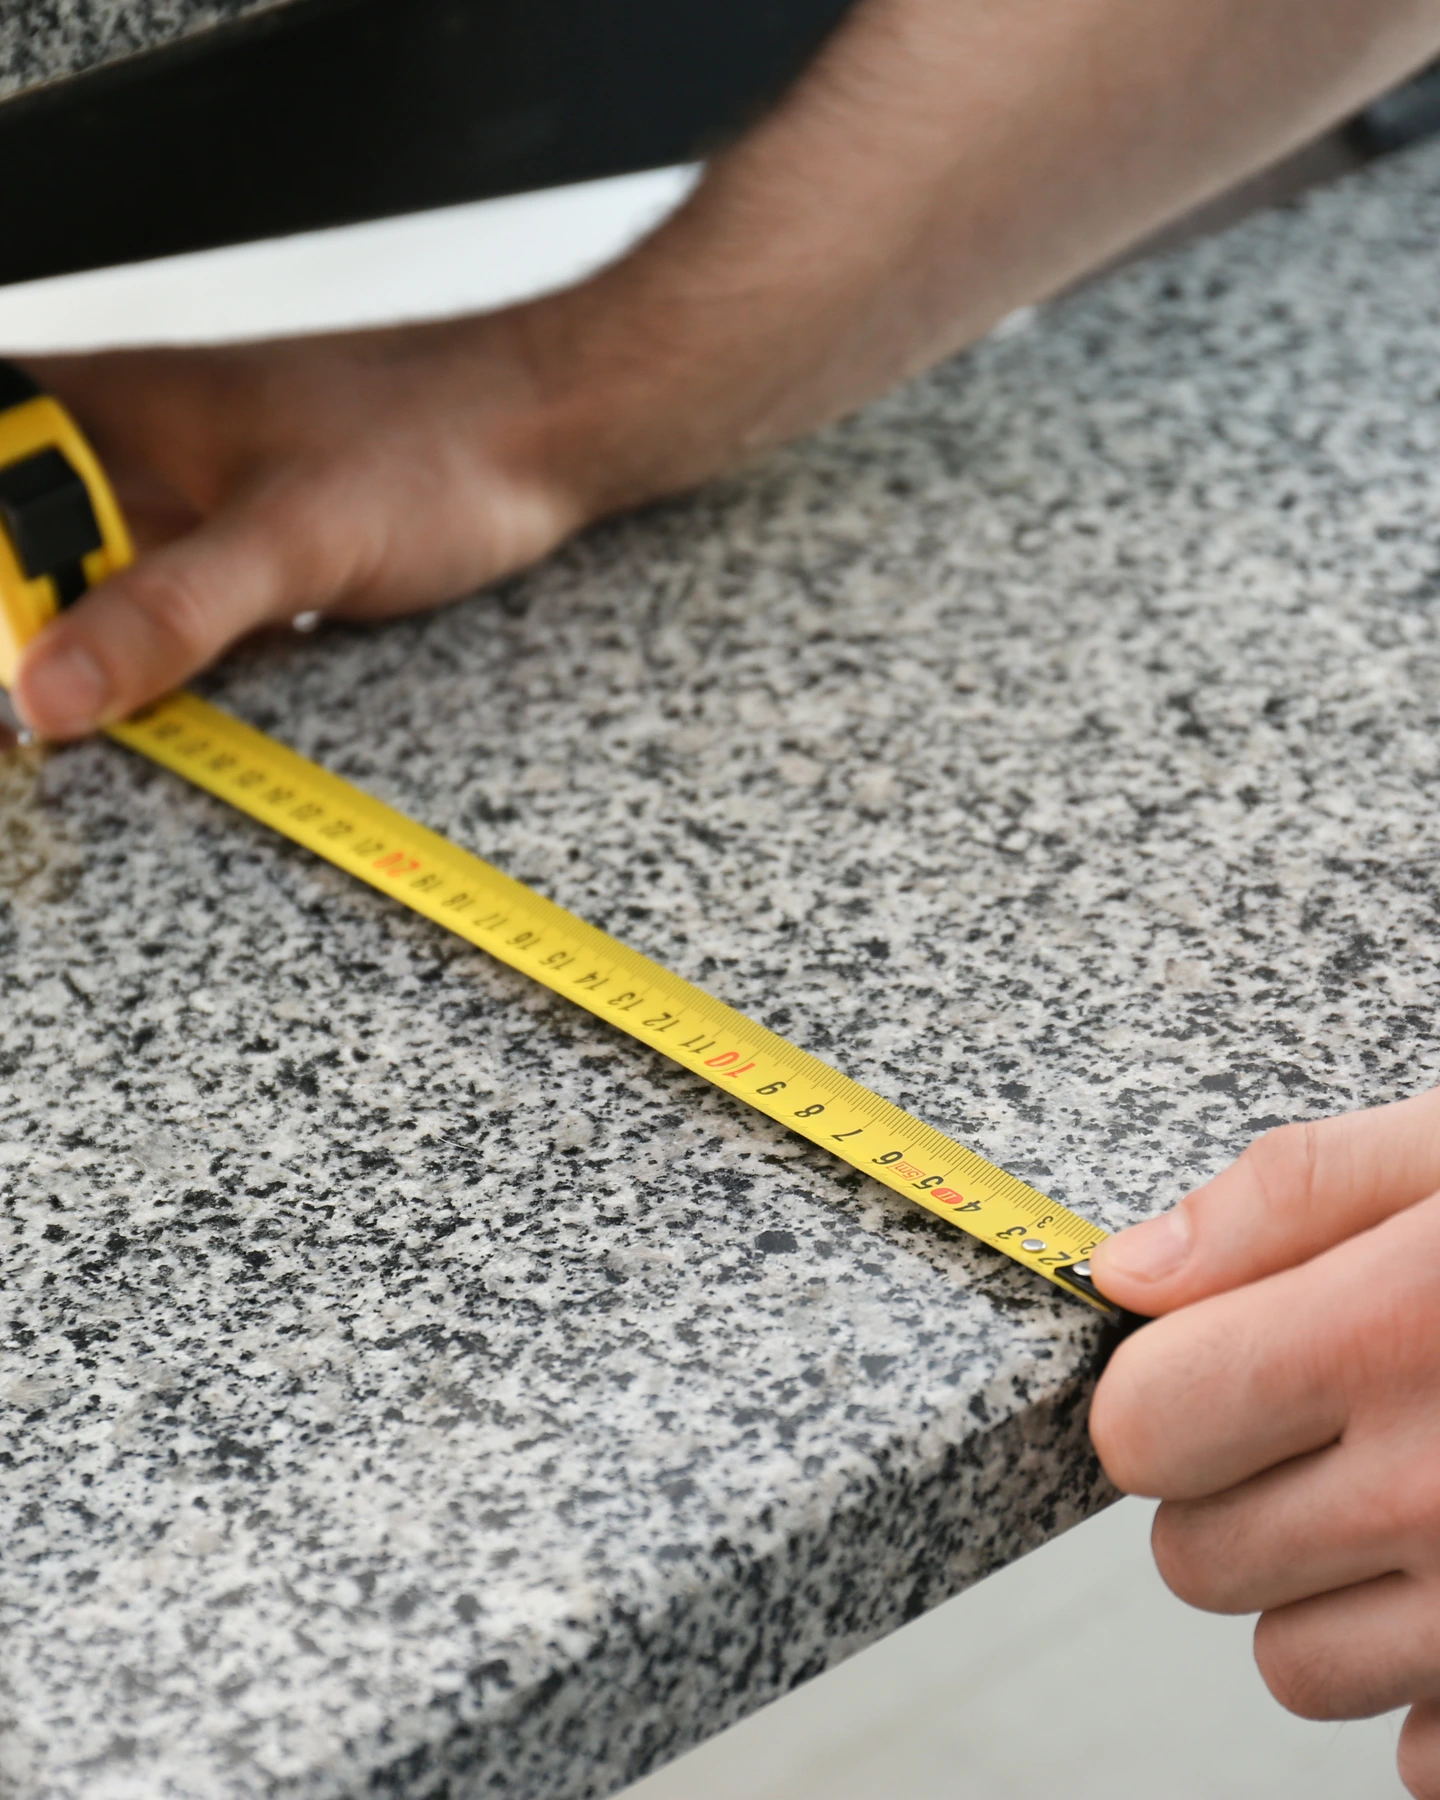
Step 1: Total Run Length (Floor to Floor)
This is the diagonal distance the rail will travel from the bottom of the staircase to the top — not the horizontal distance, not the vertical distance. The tape should touch each step's nose (front edge), not float in the air between them.

- Place tape at the nose of the top tread
- Run tape down the staircase, keeping it tight against the nose of every tread
- Extend past the bottom step to the floor (rail extends 12-18 inches past bottom tread)
- Read the measurement
Standard 13-step staircase: 12-15 feet. Under 16 feet = straight rail. Over 16 feet = extended rail (+$200-$500, still straight).
A sagging tape adds 6-12 inches of phantom length, which means a longer rail quote than you actually need.
Step 2: Tread Depth (the Horizontal Surface)
Front-to-back measurement of the step surface. IRC requires at least 10 inches with nosing, 11 inches without. Older homes sometimes have treads as shallow as 8.5 inches.
- Pick a tread in the middle of the flight (not top or bottom — those are often non-standard)
- Measure from front edge (nose) straight back to the riser behind
- Include the nosing overhang
- Measure three treads — top, middle, bottom — and note the smallest
Standard: 10-11 inches. Below 8 inches requires a conversation about bracket type. Between 8-12 inches is normal territory.
Step 3: Riser Height (the Vertical Face)
Vertical distance between one tread and the next. IRC caps at 7.75 inches. Most homes: 7-7.5 inches. Some basements push 9 inches.
- Place tape on the top surface of one tread
- Measure straight up to the top surface of the next tread above
- Measure at least three risers — bottom, middle, top — and note any variation
Standard 7.5-inch riser with 10-inch tread = 36.9-degree pitch (well within 45-52 degree spec). If risers vary by more than 1/2 inch, note it for the installer.
Step 4: Staircase Width at the Narrowest Point
- Find the narrowest point: handrail protrusion, skirting board, radiator, newel post, doorframe
- Measure from innermost surface on one side to innermost surface on the other
- If handrail present, measure from inside face of handrail to opposite wall
- Write down the narrowest number
A folded stairlift takes 11-13 inches, leaving 15-17 inches of passage on a 28-inch staircase. Below 26 inches: slim-profile model or handrail relocation needed.
Step 5: Top and Bottom Landing Dimensions
Landing dimensions determine where the stairlift parks and where the rider gets on and off. These are the measurements most homeowners forget.
Top Landing
- Clear floor space from top step's nose backward to nearest wall/door/obstruction: need at least 24-30 inches for swivel and dismount
- Check door swings — if a door at the top swings toward the staircase, it may interfere with parked chair
- Note hallway width at the top — rider exits facing the landing
Bottom Landing
- Distance from bottom step's riser to nearest obstruction: need at least 36 inches (rail extends 12-18 inches past bottom tread)
- Check door clearance — front door, closet door, basement door that swings into this space
- Note floor surface — carpet, hardwood, tile all work; uneven flagstone may need a shim plate
About one in five homes has a door that swings into where the rail parks. Fix options: hinged rail section (bottom folds up, +$300-$500) or door modification. Measure this before you call anyone.
Step 6: Electrical Outlet Location
Every stairlift needs a standard grounded 120V outlet for the charging station. The charger draws about 2-3 amps — less than a phone charger. No dedicated circuit needed.
- Grounded outlet (three-prong) within 6 feet of the parking point (usually bottom of stairs)
- Check behind furniture — outlets are often hidden behind a hall table
- No outlet within 6 feet? Adding one costs $150-$300
- Ungrounded two-prong? Upgrade needed: $100-$200
- GFCI outlet (with TEST/RESET buttons)? Note it — some chargers trip GFCI intermittently
Curved Stairs, Landings, and Special Geometry
If your staircase has any of these features, you are in curved-rail territory and a professional laser survey is required. Your pre-measurements help the phone conversation but are not sufficient alone.
| Configuration | Cost Impact | Lead Time |
|---|---|---|
| 90-degree turn (top or bottom) | +$5,000-$7,000 over straight | 4-5 weeks fabrication |
| 180-degree U-turn (switchback) | $10,000-$14,000 total | 5-6 weeks |
| Mid-flight landing | Even a 3-ft flat section = curved | 4-6 weeks |
| Spiral staircase | $15,000-$20,000+ | 6-8 weeks |
Even though a professional survey is required, these help your phone call: number of steps per straight section, landing width, direction of each turn (left/right facing upstairs), total number of turns, and photos from bottom looking up, top looking down, and at each turn.
What We Measure vs. What You Can Pre-Measure
| You Pre-Measure | We Measure on Assessment Day |
|---|---|
| Total run length (diagonal) | Precise rail length (laser) |
| Tread depth and riser height | Tread-to-tread consistency |
| Staircase width at narrowest | Wall clearance for folded seat at every point |
| Landing clearances | Exact bracket placement for load distribution |
| Outlet distance | Outlet grounding verification |
| Number/direction of turns | Photo survey or 3D scan for curved fabrication |
| Door swing conflicts | Structural integrity of treads (can they hold lag bolts?) |
Common Measurement Mistakes That Cost You Money
The rail follows the stairs at an angle. The diagonal is always longer than the horizontal. This mistake makes people think they need a shorter (cheaper) rail, and the surprise shows up on assessment day.
The rail extends 12-18 inches past the bottom step for a level parking position. Not a big deal for straight rails (cut on site) but can affect curved rail quotes where every inch is custom-fabricated.
Your staircase may be 36 inches between walls, but if a handrail protrudes 3.5 inches, your clear width is 32.5 inches. The stairlift lives in the clear width.
About one in five homes has a door that swings into the rail's parking space. Hinged rail sections and door modifications are routine but add $300-$500. Know about it before the assessment.
In older homes, tread depth can vary by an inch or more. The installer needs the shallowest tread, not the average. Measure at least three: top, middle, bottom.
Frequently Asked Questions
Within half an inch is plenty. Pre-measurements help a productive phone conversation and ballpark pricing. Precision measurements happen during the free on-site assessment with laser tools.
28 inches clear width for most models. Compact models (Handicare 1100) fit down to 26 inches. Below 26 inches, you may need to remove or relocate a handrail. Standard US residential staircases are at least 36 inches wall-to-wall.
Stand at the bottom and look up. If you can see the top landing without your line of sight being blocked by a wall, turn, or landing platform, your stairs are straight. If the staircase changes direction at any point — even one turn at the very top — you need a curved rail.
Most residential stairlifts handle up to 45-52 degrees. Standard US stairs (7.5-inch riser, 10-inch tread) are about 37 degrees — well within spec. Only truly ladder-like stairs above 52 degrees are outside range. Give us one riser height and one tread depth and we can calculate the pitch angle in seconds.
Ready to Get Started?
Free in-home assessment within 24 hours. No pressure, no obligation.