How to Measure Your Stairs for a Stairlift
Every stairlift install starts with measurements. We do the final laser survey during your free assessment, but pre-measuring your staircase gives you a head start on understanding what you need, what it will cost, and whether your stairs have any geometry that changes the conversation. Here is exactly what to measure, how to measure it, and what the numbers mean for your quote.
Why measurements matter more than the brand
The single biggest factor in your stairlift quote is not the brand, not the seat type, and not the dealer's margin. It is the physical geometry of your staircase. A straight flight with 13 standard treads and a grounded outlet at the base is a $3,200-$4,500 install. The same house with a 90-degree turn at the top landing is a $9,000-$12,000 install. The difference is entirely in the rail, and the rail is entirely determined by measurements.
Taking accurate pre-measurements accomplishes three things. First, it tells you immediately whether you are looking at a straight rail or a curved rail, which determines your price bracket before anyone walks through your door. Second, it reveals potential complications — a narrow staircase, a door swing at the bottom, a missing electrical outlet — that you can discuss on the phone before scheduling a home visit. Third, it protects you from the small number of installers who eyeball the job and quote high because they padded for uncertainty.
You do not need to be precise to the millimeter. You need to be accurate to within half an inch. A standard 25-foot metal tape measure and a notepad will do.
Tools you need (and one you don't)
What you need
- 25-foot metal tape measure — not a cloth sewing tape, not a laser measure
- Notepad and pencil — or your phone's notes app
- A helper — one person holds the tape at the top, one reads at the bottom
- A smartphone camera — take a photo of each measurement in place
What you do not need
- A laser distance measure — useful for professionals, overkill for pre-measurement, and easy to get wrong on angled surfaces
- A level — the stair angle is calculated from your tread and riser measurements
- Architectural plans — if you have them, great, but they are not necessary
All measurements should be in inches. Write them down as you go. Measure twice — the second measurement is free and a wrong number is not.
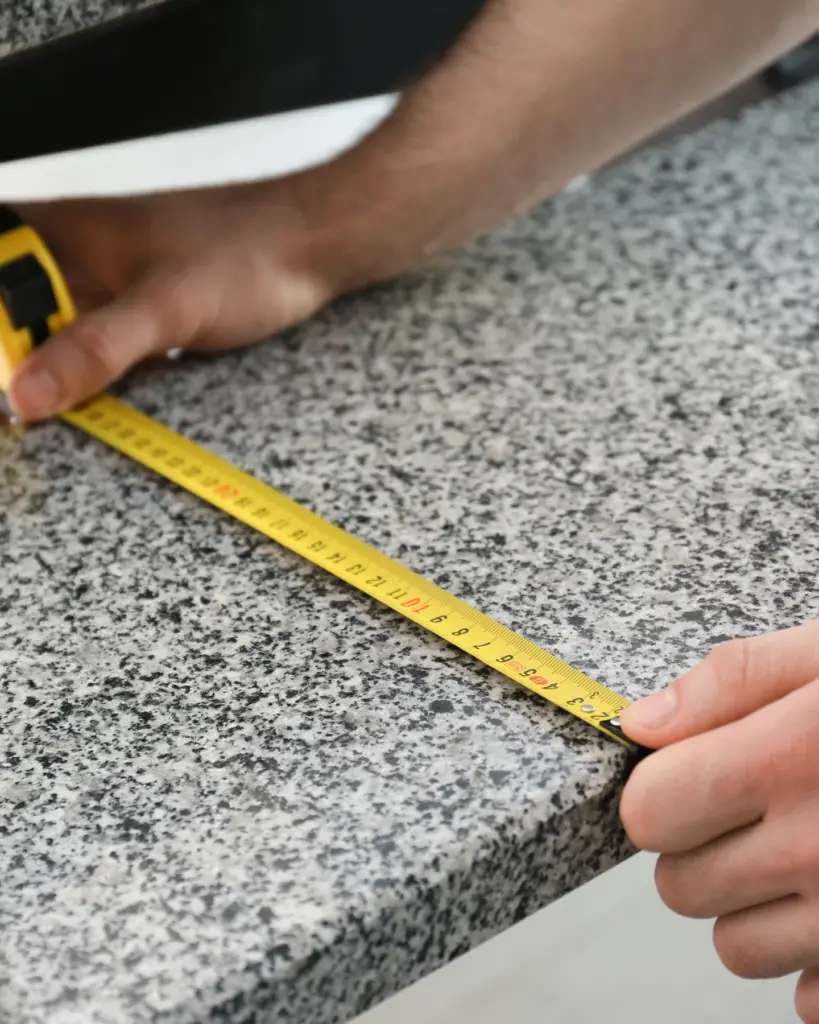
Step 1: Total run length — floor to floor
Total run length determines how much rail you need. More rail = more cost. A standard straight rail handles up to about 16 feet.
The total run length is the distance the stairlift rail will travel from the bottom of the staircase to the top. This is not the horizontal distance and it is not the vertical distance — it is the diagonal distance along the nose (front edge) of each tread.
How to measure it
- Place the end of your tape measure at the nose of the top tread — the front edge of the last step before the upper landing.
- Run the tape measure down the staircase, keeping it tight against the nose of every tread as you go. The tape should touch each step, not float in the air between them.
- Extend the tape past the bottom step to the floor. The rail will extend 12-18 inches past the bottom tread to give the chair a level parking position.
- Read the measurement. This is your total run length.
For most residential straight flights with 13 treads and a standard 7.5-inch riser, the total run length falls between 12 and 15 feet. If your measurement is under 16 feet and your staircase has no turns, you are in straight-rail territory. If it is over 16 feet, you may need an extended rail, which adds $200-$500 to the quote but is still a straight rail.
Important: Do not let the tape sag between steps. A sagging tape adds 6-12 inches of phantom length, which means a longer rail quote than you actually need.
Step 2: Tread depth (the horizontal surface)
Tread depth is the front-to-back measurement of the horizontal surface you step on. Under the International Residential Code (IRC), residential stair treads must be at least 10 inches deep with nosing, or 11 inches without nosing. Most homes built after 1970 meet this standard. Older homes, particularly pre-war Victorians and colonials, sometimes have treads as shallow as 8.5 inches.
How to measure it
- Pick any tread in the middle of the flight — not the top step or the bottom step, which are often non-standard.
- Measure from the front edge (nose) of the tread straight back to the face of the riser behind it.
- Include the nosing overhang in your measurement. The nosing is the rounded lip that sticks out past the riser below.
- Measure three different treads — top, middle, bottom — and note the smallest number.
Why the smallest matters: the stairlift rail brackets mount to the treads. If one tread is shallower than the rest, the bracket on that tread has less material to grab. Treads under 8 inches deep are not a dealbreaker, but your installer needs to know about them in advance so they can use the correct bracket type.
Standard tread depth for most US homes: 10-11 inches. Anything between 8 and 12 inches is normal stairlift territory. Below 8 inches requires a conversation with your installer about bracket placement.
Step 3: Riser height (the vertical face)
Riser height is the vertical distance between one tread and the next — the face of the step. The IRC caps residential risers at 7.75 inches. Most homes land between 7 and 7.5 inches. Older homes occasionally have risers up to 8.5 inches, and some basement stairs push 9 inches.
How to measure it
- Place your tape measure on the top surface of one tread.
- Measure straight up to the top surface of the next tread above it.
- That vertical distance is your riser height.
- Measure at least three risers — bottom, middle, top — and note any variation.
Riser height affects two things in a stairlift install. First, it determines the pitch angle of the rail. Most residential stairlifts are rated for a maximum pitch of 45-52 degrees. A standard 7.5-inch riser with a 10-inch tread gives you a 36.9-degree pitch — well within spec. Second, riser height affects the total vertical rise, which is simply the riser height multiplied by the number of steps. A 13-step staircase with 7.5-inch risers has a total vertical rise of 97.5 inches, or about 8 feet 1.5 inches — a standard floor-to-floor height for a two-story home.
Watch for inconsistent risers
Building code requires that the tallest and shortest riser in any single flight differ by no more than 3/8 inch. In older homes, we regularly find riser variation of 1 inch or more. This does not prevent a stairlift install, but it does mean the rail angle changes subtly along the run, which the installer must account for during bracket placement. If your risers vary by more than half an inch, note it.
Step 4: Staircase width at the narrowest point
Most stairlifts need at least 28 inches of clear staircase width. Compact models fit as narrow as 26 inches.
Staircase width matters for two reasons: the stairlift has to fit on the rail, and other people in the household still have to walk past the folded-up chair.
How to measure it
- Find the narrowest point of your staircase. Common pinch points: a handrail that protrudes inward, a skirting board or baseboard, a radiator at the bottom, a newel post, a doorframe at the top.
- Measure from wall to wall — or more precisely, from the innermost surface on one side to the innermost surface on the other side. If you have a handrail, measure from the inside face of the handrail to the opposite wall.
- Write down the narrowest number.
A standard stairlift seat, when folded up against the wall, takes about 11-13 inches of staircase width. That means a 28-inch-wide staircase leaves 15-17 inches of clear passage for someone walking past the parked chair — tight, but functional for most adults walking sideways. Below 26 inches total width, you need a slim-profile model (Handicare 1100 is one of the narrowest at about 10.25 inches folded) or structural modification to the handrail on the opposite side.
If your staircase is 36 inches or wider, width is not a factor in your install. Most US residential staircases built to code are at least 36 inches wall-to-wall.
Step 5: Top and bottom landing dimensions
Landing dimensions determine where the stairlift parks and where the rider gets on and off. These measurements are just as important as the staircase itself, and they are the ones most homeowners forget.
Top landing
- Measure the clear floor space from the top step's nose backward to the nearest wall, door, or obstruction. You need at least 24-30 inches for the rider to swivel the seat and step off safely.
- Check for door swings. If a door at the top of the stairs swings toward the staircase, it may interfere with the parked chair. Open the door fully and measure the clearance between the open door edge and where the chair seat will be.
- Note any hallway width restrictions at the top. The rider exits the seat facing the landing, not the staircase, so the hallway width in front of them matters.
Bottom landing
- Measure from the bottom step's riser to the nearest obstruction — a wall, a front door, a radiator, a piece of furniture. The rail extends 12-18 inches past the bottom tread, so you need at least 36 inches of clear space from the bottom riser.
- Check for door clearance at the bottom. The stairlift parks at the bottom of the stairs, and if your front door or a closet door opens into that space, you have a conflict. This is one of the most common problems we find on assessment day.
- Look at the floor surface. The stairlift rail base sits on the floor at the bottom. Carpet, hardwood, tile, and vinyl all work. Uneven flagstone or cracked concrete may need a shim plate.
The bottom-of-stairs door conflict is the number-one surprise on assessment day. If the rail extends past your bottom step and a door swings into that space, the fix is either a hinged rail (the bottom section folds up, adding $300-$500) or a door modification. Measure this before you call anyone.
Step 6: Electrical outlet location
Every residential stairlift needs a standard grounded 120V household outlet for the charging station. The outlet powers a trickle charger that keeps the two 12V DC batteries topped up. The lift itself runs on battery power, not mains electricity, so the outlet is for charging only — but without it, the batteries drain in 2-3 days of normal use.
Where to look
The charging station sits at the end of the rail where the chair parks when not in use. On most installs, that is the bottom of the stairs. Some installs park at the top. Either way, you need an outlet within 6 feet of the parking point.
- Stand at the bottom of your stairs. Look for a grounded outlet (three-prong) within 6 feet of the bottom step. Check behind furniture — outlets are often hidden behind a hall table or coat rack.
- If there is no outlet within 6 feet, note the distance to the nearest one. An electrician can add an outlet for $150-$300, and most stairlift installers handle this as part of the job.
- Check whether the outlet is grounded. An ungrounded two-prong outlet needs to be upgraded to a grounded three-prong before install. This is a $100-$200 job for an electrician.
- If you have a GFCI outlet (the kind with TEST and RESET buttons, usually in kitchens and bathrooms), note it. Some stairlift chargers trip GFCI outlets intermittently. Your installer may recommend a standard grounded outlet instead.
The outlet does not need to be on a dedicated circuit. A stairlift charger draws about 2-3 amps — less than a phone charger. It can share a circuit with hallway lights, a smoke detector, or anything else that is not a high-draw appliance.
Curved stairs, landings, and other special geometry
Everything above applies to a straight, single-flight staircase. If your staircase has any of the following features, you are in curved-rail territory, and your pre-measurements are helpful but not sufficient — a professional laser survey is required.
90-degree turn at the top or bottom
The most common curved configuration. The staircase runs straight and then turns 90 degrees onto a landing or directly onto the upper floor. A single 90-degree turn typically adds $5,000-$7,000 to the cost over a straight rail because the rail must be custom-fabricated to your exact turn radius.
180-degree U-turn (switchback)
Two parallel flights connected by a flat landing where the direction reverses. The rail must navigate two 90-degree turns and a flat section. Cost: $10,000-$14,000 for the curved rail, depending on the landing width and the turn radii.
Mid-flight landing
A flat section in the middle of an otherwise-straight run, often found where a staircase changes direction between floors. The rail must transition from the incline to a flat section and back to an incline. Even a 3-foot flat landing in the middle changes the job from straight to curved.
Spiral staircase
A continuous helical staircase with pie-shaped treads radiating from a central pole. These are the most complex and expensive stairlift installations. The rail follows a true helix, every bracket is at a unique angle, and fabrication takes 3-4 weeks instead of the usual 1-2 weeks for a standard curved rail. Cost: $15,000-$20,000+. Some installers decline spiral jobs altogether.
What to pre-measure for curved stairs
Even though a professional survey is required, these pre-measurements help your phone conversation go faster:
- Number of steps on each straight section
- Width of any intermediate landing
- Direction of each turn (left or right, facing upstairs)
- Total number of turns
- Photos — take one from the bottom looking up, one from the top looking down, and one at each turn
What we measure vs. what you can pre-measure
You can pre-measure
- Total run length (diagonal, nose to nose)
- Tread depth (front to back, including nosing)
- Riser height (vertical, tread to tread)
- Staircase width at narrowest point
- Top and bottom landing clearance
- Distance to nearest grounded outlet
- Number of steps
- Number and direction of turns
- Door swing conflicts
We measure on assessment day
- Precise rail length using a laser distance measure
- Pitch angle at multiple points along the run
- Tread-to-tread consistency (are your treads uniform?)
- Structural integrity of the stair treads (can they hold lag bolts?)
- Exact bracket placement for optimal load distribution
- Wall clearance for the folded seat at every point
- Electrical outlet grounding verification
- Curved-rail geometry using a photo survey or 3D digital scan
Your pre-measurements give us about 80% of what we need to have a meaningful phone conversation and provide a ballpark price range. The remaining 20% is precision work that requires hands-on verification and, for curved rails, the photo survey or laser scan that feeds the factory fabrication order.
We never charge for the on-site measurement. It is part of the free assessment. Schedule yours here — we will confirm your pre-measurements, do the precision work, and leave you with a written quote the same day.
Common measurement mistakes that cost you money
- Measuring the horizontal floor-to-floor distance instead of the diagonal stair run. If you lay the tape across the room from the bottom of the stairs to the wall below the top landing, you get the horizontal projection, not the rail length. The rail follows the stairs at an angle. The diagonal is always longer than the horizontal. This mistake makes people think they need a shorter (cheaper) rail than they actually do, and the surprise shows up on assessment day.
- Forgetting the bottom overrun. The rail extends 12-18 inches past the bottom step so the chair can park on a level section. If you measured only to the bottom step, your total run measurement is 12-18 inches short. Not a huge deal for a straight rail (the installer cuts to length on site), but it can affect the quote for a curved rail where every inch is custom-fabricated.
- Measuring wall-to-wall instead of clear width. Your staircase may be 36 inches between walls, but if a handrail protrudes 3.5 inches on one side, your clear width is 32.5 inches. The stairlift lives in the clear width, not the wall-to-wall width.
- Ignoring the door at the bottom. About one in five homes we visit has a door — front door, closet door, basement door — that swings into the space where the rail needs to park. This is not a dealbreaker (hinged rail sections and door modifications are routine), but it does add $300-$500 to the install. Know about it before the assessment.
- Assuming all treads are the same depth. In older homes, tread depth can vary by an inch or more from top to bottom. The installer needs to know about the shallowest tread, not the average tread. Measure at least three — top, middle, bottom.
Common questions
How accurate do my pre-measurements need to be?
Can I just send photos instead of measuring?
What is the minimum staircase width for a stairlift?
Do I need a special electrical outlet for a stairlift?
How do I know if my stairs are straight or curved?
What if my stairs are too steep for a stairlift?
Your free home assessment is one phone call away
No deposit. No obligation. No high-pressure sales. A certified installer visits your home, measures once, and gives you a written quote that's honored for 30 days. It takes about 45 minutes. More than 15,000+ homeowners have said yes over the last 15 years.
- Licensed in all 50 states
- $2M liability insured
- BBB A+ since 2012
- 15+ years in business